Building A Super Cool Colorful Logger with Deno fmt module
Logging trace is one of the basic needs of any programming language. It does not matter how good your code is unless it is not traceable and debugable. For debugging, Logging is one of the best tools. It is fast and easy to follow. If you are working on local system This could be your best mate while debugging.
LOG WELL, LIVE WELL

Here in this tutorial, I will explain. How you can build a super cool logger with just minimal code (a few lines of the code). That is also without using any third-party tool.
Prerequisites
- Deno: Install Deno if you don't have it installed
- Basic-Typescript: basic-types
Just like Nodejs/JavaScript. Logging can be done using console.log
console.log("Hello World");
Nice! However formatting log message is big pain is javascript. console.log partially implements functions like printf from c++ or java. But it doesn't support all the features.
So how we should log formatted messages?
Formatted Log in JS
Using String template.
const name = "Deepak";
const salary = 2000;
console.log(`My name is ${name} and my salary is ${salary}$`);

// My name is Deepak and my salary is 2000$
Cool! But we can see for each parameter in the template, we have to give you a constant/variable. It will be hard to create variables just to log something.
Using Vargs in
console.log.
const name = "Deepak";
const salary = 2000;
console.log(`My name and salary are `, name, salary);

// My name and salary are  Deepak 2000

const person = { name: "deepak", salary: 2000 };
console.log(`Info: `, person);
// Info:  { name: 'deepak', salary: 2000 }
The above statement is valid in javascript. We can pass any number of vargs to console.log However, we can't arrange the message with variables. This is very useful to print anything just by separating value from comma. But this can not be used for logging something useful.
Issues with vargs
- Unpredicted implementation
- Error-prone
Let's see by an example:
const person = { name: "deepak", salary: 2000 };
const address = { street: "221B baker street london", zip: 20000 };
console.log("Person info: " + person + " Address: " + address);
// Person info: [object Object] Address: [object Object]
If you try to append the object with string it converts to the string which is [object Object] for object and appended.
Solution:
const person = { name: "deepak", salary: 2000 };
const address = { street: "221B baker street london", zip: 20000 };
console.log(
  "Person info: " +
    JSON.stringify(person) +
    " Address: " +
    JSON.stringify(address)
);
// Person info: {"name":"deepak","salary":2000} Address: {"street":"221B baker street london","zip":20000}

// Or

console.log("Person info: ", person, " Address: ", address);
// Person info:  { name: 'deepak', salary: 2000 }  Address:  { street: '221B baker street london', zip: 20000 }
Use Partial printf like feature in
console.log.
const person = { name: "deepak", salary: 2000 };
const address = { street: "221B baker street london", zip: 20000 };
console.log(
  "Person info: name: %s salary: %d and Address: street: %s ",
  person.name,
  person.salary,
  address.street
);
// Person info: name: deepak salary: 2000 and Address: street: 221B baker street london
Here you can see, console.log does support printf like functions. However, this is limited until %s [string], %d [number]. Mozilla does support Precision formatting something like %.2f.
Introduction to PrintF
Deno is highly inspired by Go. Just like Go, Deno also has fmt module in the standard library. This module/package is a combination of multiple sub-modules like printf.
fmt module is still in work-in-progress status according to developers.
Importing printf:
import { printf } from "https://deno.land/std/fmt/printf.ts";
Definition of printf:
export function printf(format: string, ...args: unknown[]): void {
  const s = sprintf(format, ...args);
  Deno.stdout.writeSync(new TextEncoder().encode(s));
}
printf takes string and vars of unknown. The format is to define what the format of the string will look like. args could be anything according to the format you wanted.
Sample of printf:
const person = { name: "deepak", salary: 2000 };
printf(`Person Name: "%s" and Salary: %d\n`, person.name, person.salary);

// Person Name: "deepak" and Salary: 2000
According to Deno documents
The following verbs are supported:
| Verb | Meaning |
|---|---|
% | print a literal percent |
t | evaluate arg as boolean, print true or false |
b | eval as number, print binary |
c | eval as number, print character corr. to the codePoint |
o | eval as number, print octal |
x X | print as hex (ff FF), treat string as list of bytes |
e E | print number in scientific/exponent format 1.123123e+01 |
f F | print number as float with decimal point and no exponent |
g G | use %e %E or %f %F depending on size of argument |
s | interpolate string |
T | type of arg, as returned by typeof |
v | value of argument in 'default' format (see below) |
j | argument as formatted by JSON.stringify |
Verbs with Width and Precision
%9f width 9, default precision %.9f default width, precision 9 %8.9f width 8, precision 9 %8.f width 9, precision 0
Sample of Width and Precision:
const person = { name: "deepak", salary: 2000.2 };
printf(`Person Name: "%s" and Salary: %9.2f\n`, person.name, person.salary);

// Person Name: "deepak" and Salary:   2000.20
You can write more complex examples like padding and get the value of the vargs passed to printf function.
Sample of Padding:
const person = { name: "deepak", salary: 2000.2 };

// Padding Zero

printf(`Salary: %09.2f\n`, person.salary);

// Salary: 002000.20
The conversion of rgb to hex color is so simple.
const r = 5,
  g = 255,
  b = 100;
printf("RGB TO HEX: #%02x%02x%02x\n", r, g, b);

// RGB TO HEX: #05ff64
More Complex use index of vargs values:
const person = { name: "deepak", salary: 2000.2 };

printf(
  "Person has salary %d, which(%[1]d) is less than average salary %d\n",
  person.salary,
  4000
);

// Person has salary 2000.2, which(2000.2) is less than average salary 4000
Colors in Log
THE DOOR IS RED HERE THE WRITER USES THE COLOR TO EXPRESS HIS ANGER

Another issue with console.log, It does not support colors out of the box. We end-up adding libraries like colors in NodeJs. The browser has some additional support for css console.log. But that will not work in NodeJs
Thanks to Deno's Colors module. Now we can easily color our life.
Importing colors:
import { red, yellow, gray, cyan } from "https://deno.land/std/fmt/colors.ts";
colors module also supports rgb colors
import { rgb8, bgRgb8, rgb24 } from "https://deno.land/std/fmt/colors.ts";
From Deno source:
/** Set background color using paletted 8bit colors.
 * https://en.wikipedia.org/wiki/ANSI_escape_code#8-bit */
export function bgRgb8(str: string, color: number): string {
  return run(str, code([48, 5, clampAndTruncate(color)], 49));
}
Now, We have all the basic tools. Let's finish the Logger implementation

Create a Basic Logger Class
Define interfaces:
import { sprintf, printf } from "https://deno.land/std/fmt/printf.ts";
import { red, yellow, gray, cyan } from "https://deno.land/std/fmt/colors.ts";

type LogLevel = 0 | 1 | 2 | 3;

interface LoggerOptions {
  level: LogLevel;
  format?: string;
}
Create a constructor and define default values for log level and format:
import { sprintf, printf } from "https://deno.land/std/fmt/printf.ts";
import { red, yellow, gray, cyan } from "https://deno.land/std/fmt/colors.ts";

type LogLevel = 0 | 1 | 2 | 3;

interface LoggerOptions {
  level: LogLevel;
  format?: string;
}

const initialOptions = { level: 0, format: "%s\n" };

class Logger {
  private _level: LogLevel;
  private _format: string;

  constructor(options: LoggerOptions = initialOptions as LoggerOptions) {
    const { level, format } = { ...initialOptions, ...options };
    this._level = level;
    this._format = format;
  }
}
Define getter setter for level and format:
const initialOptions = { level: 0, format: "%s\n" };
class Logger {
  private _level: LogLevel;
  private _format: string;
  /// rest of the code
  get level(): LogLevel {
    return this._level;
  }
  set level(_l: LogLevel) {
    this._level = _l;
  }
  get format(): string {
    return this._format;
  }
  set format(_f: string) {
    this._format = _f;
  }
}
This is to hide the definition. You can remove setters if you don't want user to modify the values.
Add basic methods:
const initialOptions = { level: 0, format: "%s\n" };
class Logger {
  private _level: LogLevel;
  private _format: string;
  /// rest of the code
  log(...messages: unknown[]) {
    printf(gray(sprintf(this.format, ...messages)));
  }
  info(...messages: unknown[]) {
    printf(cyan(sprintf(this.format, ...messages)));
  }
  warn(...messages: unknown[]) {
    printf(yellow(sprintf(this.format, ...messages)));
  }
  error(...messages: unknown[]) {
    printf(red(sprintf(this.format, ...messages)));
  }
}
Sample Run:
import { Logger } from "./logger.ts";

const logger = new Logger({ level: 0, format: "Logger: %s" });
logger.log("This is log message");
logger.info("This is info");
logger.warn("This is warn");
logger.error("This is error");
Output:

If you notice, I am using sprintf before using printf. Since I want the full control on the printing message like adding colors and using the dynamic format. I have to use sprintf instead of printf.
Let's allow the user to modify format at runtime:
const initialOptions = { level: 0, format: "%s\n" };
class Logger {
  private _level: LogLevel;
  private _format: string;
  /// rest of the code
  log(format: string, ...messages: unknown[]) {
    if (messages.length === 0) {
      messages = [format];
      format = this.format;
    }
    printf(gray(sprintf(format, ...messages)));
  }
  info(format: string, ...messages: unknown[]) {
    if (messages.length === 0) {
      messages = [format];
      format = this.format;
    }
    printf(cyan(sprintf(format, ...messages)));
  }
  warn(format: string, ...messages: unknown[]) {
    if (messages.length === 0) {
      messages = [format];
      format = this.format;
    }
    printf(yellow(sprintf(format, ...messages)));
  }
  error(format: string, ...messages: unknown[]) {
    if (messages.length === 0) {
      messages = [format];
      format = this.format;
    }
    printf(red(sprintf(format, ...messages)));
  }
}
Sample Run2:
import { Logger } from "./logger.ts";

const logger = new Logger({ level: 0, format: "Logger: %s" });
logger.log("This is log message");
logger.warn("This is warn");

logger.log(
  "Overridden Info- Method: //%s %s [response time]: %05f ms",
  "POST",
  "https://www.google.com",
  100
);
logger.error(
  "Overridden Error- Error: //%s",
  new Error("This is error").message
);
Output:

Final Touch: Use of log levels
const initialOptions = { level: 0, format: "%s\n" };
class Logger {
  private _level: LogLevel;
  private _format: string;
  /// rest of the code
  log(format: string, ...messages: unknown[]) {
    if (this.level > 0) return;

    if (messages.length === 0) {
      messages = [format];
      format = this.format;
    }
    printf(gray(sprintf(format, ...messages)));
  }
  /// rest of the code
}
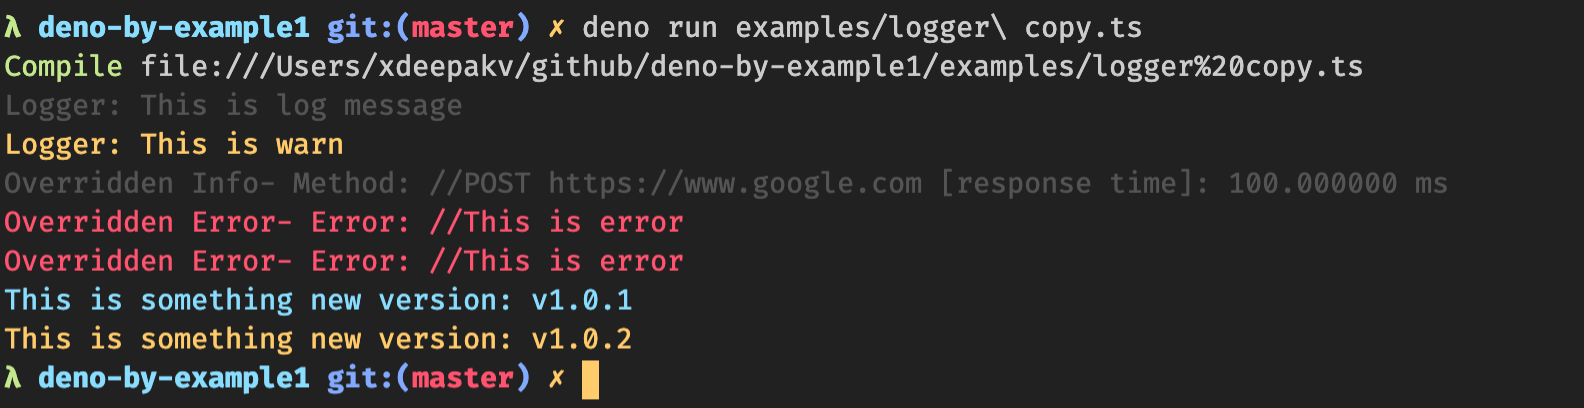
Final Run:
import { Logger } from "./logger.ts";

const logger = new Logger({ level: 0, format: "Logger: %s" });
logger.log("This is log message");
logger.warn("This is warn");

logger.log(
  "Overridden Info- Method: //%s %s [response time]: %05f ms",
  "POST",
  "https://www.google.com",
  100
);
logger.error(
  "Overridden Error- Error: //%s",
  new Error("This is error").message
);

// Change level

logger.level = 2;

// This will not print
logger.log(
  "Overridden Info- Method: //%s %s [response time]: %05f ms",
  "POST",
  "https://www.google.com",
  100
);

// This will print
logger.error(
  "Overridden Error- Error: //%s",
  new Error("This is error").message
);

// Change default format
logger.level = 1;

logger.format = "This is something new version: v%s";

logger.info("1.0.1");
logger.info("1.0.2");
Output:
Nice! Well done! We have done it!!

Logger class can be found inFor more examples like this, visit: https://decipher.dev/deno-by-example
I hope you like this tutorial. let me know your feedback in the comment. Please support(🙏🙏) by subscribing and clapping on https://deepak-v.medium.com/.